Installing & Compiling OpenGTS Tracking System~!

Opengts

# Project ကလုပ္ခဲ့တာ ၁ႏွစ္ေက်ာ္ေက်ာ္ေလာက္ေတာ့ ရွိပီဗ်။ အဲ့တုန္းက လုပ္ထားတဲ့ Documentation ကိုပဲ ျပန္တင္တာပါ။

# မဟုတ္ရင္ ၾကာရင္ ေမ့သြားမွာစိုးတာရယ္၊ တျခား reference လုပ္လိုတဲ့သူေတြအတြက္ Share လိုက္ပါတယ္။

# GPS Tracking System နဲ႕ပတ္သက္ရင္ ဒီ OpenGTS တစ္ခုတည္းပဲ ရွိတာေတာ့ မဟုတ္ဖူးဗ်။ တျခား OpenSource  (or) CloseSource ေတြ အမ်ားအျပားရွိပါေသးတယ္။

Ok! let’s start.

Preparing & Setting Environment Variables

  1. ပထမဆံုး jdk-7u72-windows-x64 ကိုသြင္းပါ(default)။ ၿပီးရင္ Java run၊ မ run cmd ထဲမွာ စစ္ပါ။

java –version

  ( make sure it says “Java™” & “Java Hotspot™ Client VM” )

  1. mail-1.5.2.jar ဖိုင္ကို C:\Program Files\Java\jdk1.7.0_72\jre\lib\ext ထဲသို႕ Copy ကူးပါ။
  2. Apache “Ant” Folder ကို C:\Program Files\apache-ant ေအာက္သို႕ ေရြ႕ပါ။
  3. Apache-Tomcat Folder ကို C:\Program Files\apache-tomcat ေအာက္သို႕ေရြ႕ပါ။
  4. mysql-5.6.22-winx64 ကို Default feature အတိုင္း သြင္းပါ။
  5. mysql-connector-java-5.1.34 ဖိုင္ကို C:\Program Files\Java\jdk1.7.0_72\jre\lib\ext ထဲသို႕ Copy ကူးထည့္ပါ။
  6. 5.7 Folder ကို C:\OpenGTS_2.5.7 ေအာက္သို႕ ကူးထည့္ပါ။
  7. ၿပီးရင္ Variables ေတြ ေပါင္းသတ္မွတ္ပါမယ္။
  8. Run box ထဲမွာ sysdm.cpl ဟုရိုက္ပါ။ Advanced Tab ကိုသြားပါ။ Environment Variables ကို ႏိွပ္ပါ။
  9. System Variable ထဲမွာ New ကိုႏွိပ္ပါ။ Variable name ကို JAVA_HOME ဟုေပးပါ။ (capital letters)
  10. Variable Value မွာ C:\Program Files\Java\jdk1.7.0_72 ကိုထည့္ပါ။
  11. OK ႏွိပ္ပါ။ ဆက္လက္ၿပီး New ကိုႏွိပ္ပါ။
  12. Variable Name ကို ANT_HOME ေပးပါ။ Variable value ေနရာတြင္ C:\Program Files\apache-ant ထည့္ပါ။
  13. OK ႏွိပ္ပါ။ ဆက္လက္ၿပီး New ကိုႏွိပ္ပါ။
  14. Variable Name ကို CATALINA_HOME ေပးပါ။ Value ေနရာတြင္ C:\Program Files\apache-tomcatထည့္ပါ။
  15. OK ႏွိပ္ပါ။ ဆက္လက္ၿပီး New ကိုႏွိပ္ပါ။
  16. Variable Name ကို GTS_HOME ဟုေပးပါ။ Value ေနရာတြင္ C:\OpenGTS_2.5.7 ကိုထည့္ေပးပါ။
  17. System Variable ထဲမွာ Path ကိုရွာပါ။ Select ေပးၿပီး Edit ႏွိပ္ပါ။
  18. Variable Value ၏ ေနာက္ဆံုးေနရာမွာ semicolon [;] ခံၿပီး C:\Program Files\MySQL\MySQL Server 5.6\bin ကို ထည့္ပါ။
  19. Semicolon[;] ထပ္ခံၿပီး %JAVA_HOME%\bin ကိုဆက္ထည့္ပါ။
  20. Semicolon[;] ထပ္ခံၿပီး %ANT_HOME%\bin ကိုဆက္ထည့္ပါ။ [semicolon ခံစရာမလိုေတာ့ပါ။ OK ႏွိပ္ပါ။


Installing NT Service & Compiling OpenGTS Tracking System

  1. Run box ထဲကေန cmd ေခၚပါ။
  2. mysqld ကိုရိုက္ၿပီး enter ေခါက္ပါ။ TimeStamp error ျပေနပါလိမ့္မည္။ သို႕ေပမဲ့ Run ပါသည္။
  3. Run မ Run ကို Task Manager ေခၚၿပီး Process ထဲတြင္ ၾကည့္ပါ။ mysqld ဆိုပီး ေပၚေနပါလိမ့္မည္။
  4. cmd ကုိ ပိတ္မပစ္ဘဲ ဆက္ Run ထားပါ။ ေနာက္တခု cmd ထပ္ေခၚပါ။
  5. mysqld –install ဟုရိုက္ၿပီး Enter ေခါက္ပါ။ Successfully installed Service ဆိုပီး ေပၚလာပါလိမ့္မည္။
  6. MySQL သည္ default အားျဖင့္ password မပါပါ။ password ခ်ိန္းပါမယ္။
  7. mysql –uroot –p ဟုရိုက္ပါ။
  8. Enter Password ဟုေပၚလွ်င္ ဘာမွမရိုက္ဘဲ Enter ေခါက္ပါ။
  9. mysql > prompt ေပၚေနပါလိမ့္မည္။
  10. update mysql.user set password=password(‘password’)where user=’root’;
  11. ဟုရိုက္ပါ။ မ်က္ေတာင္ အဖြင့္အပိတ္ျပထားေသာ password ေနရာတြင္ password ကိုရိုက္ထည့္ပါ။

(root ေနရာတြင္ ဒီအတိုင္း ထားပါ။ မေျပာင္းပါႏွင့္)

  1. Query OK ဘာညာဆိုပီး ျပေနပါလိမ့္မည္။ ေနာက္တေၾကာင္းတြင္ flush privileges; ဟုရိုက္ထည့္ပါ။
  2. Effect ျဖစ္သြားပါလိမ့္မည္။ quit ရိုက္ပီးထြက္ပါ။ အဆင့္ ၇ မွ ျပန္၀င္ၿပီး Password ေျပာင္းမေျပာင္းစမ္းသပ္ပါ။
  3. Apache-Tomcat အားNT Service သြင္းရန္ cd %CATALINA_HOME%\bin ဟုရိုက္ပါ။
  4. bat install ဟုရိုက္ပါ။ (Run box ထဲမွ services.msc ေခၚၿပီး ၀င္၊ မ၀င္ၾကည့္ႏိုင္သည္။)
  5. cmd ထဲမွဆက္လက္ၿပီး openGTS compiling လုပ္ရန္ cd %GTS_HOME% ဟုရိုက္ကာ Directory ခ်ိန္းပါ။
  6. OpenGTS Folder လမ္းေၾကာင္းသုိ႕ေရာက္သြားပါလိမ့္မည္။ ant all ဟု ရိုက္ပါ။
  7. Build Sucessful ဟုေပၚလာပါလိမ့္မည္။ (error ျပေနလည္း ကိစၥမရွိပါ။)
  8. OpenGTS Database ေဆာက္ဖို႕အတြက္ db ကို import လုပ္ပါမယ္။
  9. cd %GTS_HOME%\bin ေအာက္သို႕ျပန္၀င္ပါ။
  10. bat “-rootUser:root” “-rootPass:password” 

    ဟုရိုက္ၿပီးEnter ေခါက္ပါ။

(password ေနရာတြင္ ေျပာင္းထားေသာ password ကို ထည့္ေပးပါ။)

  1. db ေတြ Create လုပ္သြားတာ ျမင္ရပါလိမ့္မည္။
  2. Web Interface ကို Access လုပ္ရန္ system account တခု ဖြင့္ပါမယ္။
  3. bat Account –account:sysadmin –pass:password –create

(password ေနရာတြင္ကိုယ္ႀကိဳက္တာေပးပါ။)

  1. openGTS ထဲက ဖိုင္ကို Tomcat server ထဲထည့္ပါမယ္။ Build ေအာက္တြင္ track.war ကိုရွာပါ။
  2. cd %GTS_HOME%\bin ဟုျပန္ရိုက္ပီး ant track.war ဟုျပန္ရိုက္ပါ။

(PDF ထဲတြင္ မည္သည့္ xml, conf ဖိုင္မ်ားကို ျပင္ပီးတိုင္း compile ျပန္လုပ္ေပးရမယ္လို႕ ေျပာထားပါတယ္)

  1. Compile ၿပီးသြားလွ်င္ Build\track.war ဖိုင္ကို C:\Program Files\apache-tomcat\webapps ေအာက္သို႕ Copy ကူးထည့္ပါ။
  2. Browser ေခၚၿပီး http://localhost:8080/track/Track ကိုေခၚၾကည့္ပါ။

Virtualization & Server2008R2 Active Directory

Hello everyone. Long time no see.

Recently, I attend Japan IT Networking class on local country. Before I took that class,
I already passed the exam and class from “Mikrotik” – MTCNA Certificate. That’s why, I did not totally update this blog.

Here describe slideshare is one of the presentation file from my experience. For your future reference and who will want to learn, I share it.
So, stay with me.

Greeting from MYANMAR.

pfSense 2.1 x64bit on Custom ESxi 5.5

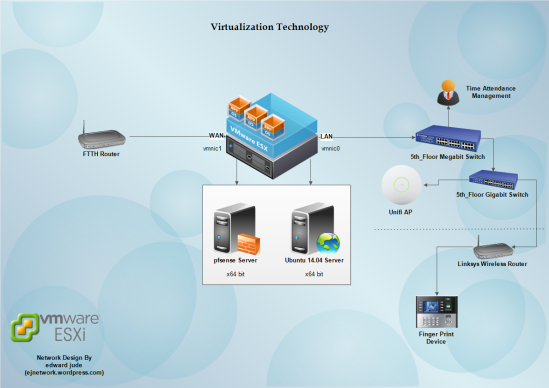
Recently at my work, I deployed new custom vSphere Hypervisor ESXi 5.5 machine. What did you say, custom? You may want to ask because my ESXi server is not branded, its clone PC with lower hardware resources. But it works like a charm and great. Actually, that server is only purpose for pfSense and ubuntu server. pfSense is use for proxy and ubuntu to svn server. In this post, I want to describe solution while install for custom ESXi server and edit network setting for pfSense.
vimg
Here is my hardware specs:
ASUS H81M Series Motherboard
Core i3 3.30GHz
8GB Memory (No ECC)
500GB Harddisk (No RAID)
1GbE Realtek (Onboard)
1GbE Realtek (External PCIe Card)

Remark : This hardware specification is not recommended from vmware community.
Now let’s start~!
Firstly, You need to make custom ESXi iso because new ESXi ISO is not included Realtek drivers. My mainboard have R8163 chip. You can find what series of chip is currenly use in the mainboard manual or vendor website. Here is the pre-configure ESXi ISO link. https://drive.google.com/file/d/0B9e0e9dGgCykV0xFMlRJY1Rydm8/edit?usp=sharing

Step 2 – You need to enter the BIOS Setting and make sure Intel Virtualization Technology is enabled.

Step 3 – If your mainboard have UEFI boot support and other operating system is loaded before installing ESXi, you need to disable Secure boot on BIOS Setting and clear the key.

Now, left session is installing vSphere Hypervisor and vShpere Client. I believe you can do like kid playing in the park. 😀

Let’s go to the pfSense section.
Before installing any guest OS on ESXi 5.5, I recommend install too VMware Workstation 10 if you have.
It will very helpful while you editing vmware hardware resources. Coz, vSphere client is not support vmware hardware version 10. Client will be say you need to install vSphere Web Client to edit hardware settings. There are other methods available on NET. But it is better for us and begineers 🙂

Step 4 – Install pfSense on ESXi 5.5 with default option. Just use WAN interface and config for trial. And when finish, halt the system

Step 5 – In vSphere Client inventory interface, select Configuration Tab and go to Networking

Step 6 – Select Add Networking and choose Virtual Machine option button in Connection Types

Step 7 – Click Next and choose Create a Virtual Switch selecting with vmnic1

Step 8 – Click Next and give the Network label to WAN

Step 9 – Open VMware Workstation 10 for editing hardware resources and connect ESXi Server

Step 10 – Just add Network Adapter and choose WAN from drop down list in pfSense setting

Finish! You need to configure which interface is WAN or LAN in pfSense. As the above I already said, it is like kids playing in the park for you.

pfSense Squid Tips~!

# Short Notes(Created By edwardjude/ejnetwork.wordpress.com)/(Squid 2.7 Stable Package)
~!To block All destination Domain (HTTP) and allow only specific sites (edit manually on squid.conf)
—————–
# acl allowed_sites {dst|dstdomain|dstdom_regex|url_regex}
(To allow specific sites or domain with regular expression)
# acl all_dst dst 0.0.0.0/0.0.0.0 (To block all destination)
# http_access allow allowed_sites (Allow Rule for Defined ACL)
# http_access deny all_dst (Deny Rule for Defined ACL)
# deny_info URL_path_from_U all_dst (Deny Info page for Defined ACL)
—————–

~!To block download of some file extension (edit manually on squid.conf or edit from GUI in Custom Options)
—————–

 acl blockfiles url_regex -i URL_path_from_U 
 http_access deny blockfiles

—————-
Remark : When you create the file path, you need to edit of this $ expression in file.
(\.exe$)

Blocking Domains with Pfsense using DNS Forwarder~!

# Hi all! Long time no see. This article is really written by me!! 😀
# I’m gonna show you dns blocking with pfsense using DNS Forwarder Services…
# It’s like kids playing in the park. Anyone can do easily from WebGUI page from Pfsense Firewall.
# Ok! Now let’s do that ..
# You need Two options to do that ~!
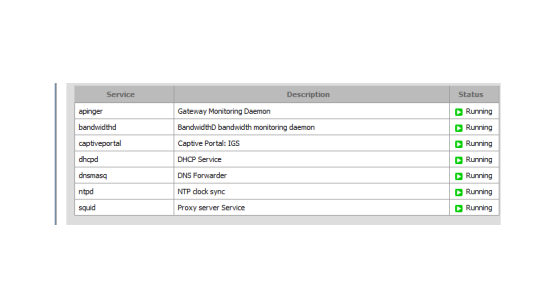
# Firstly, you need to run services like dnsmasq service. Green status is up and running.
pfsense_services
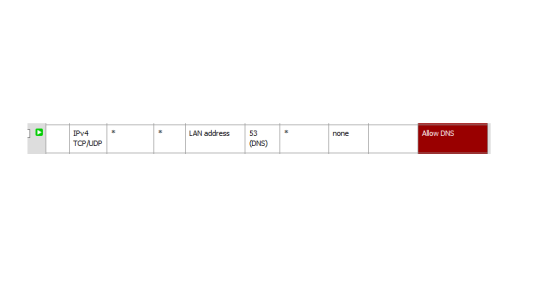
# Secondly, You should make sure your LAN party DNS traffic redirect to your local DNS Forwarder Service.(Firewalling)
# This procedure will let you block DNS requests to servers that are off your network. This will let you force DNS requests from local clients to use pfSense’s DNS forwarder for resolution.
Firewall_rule
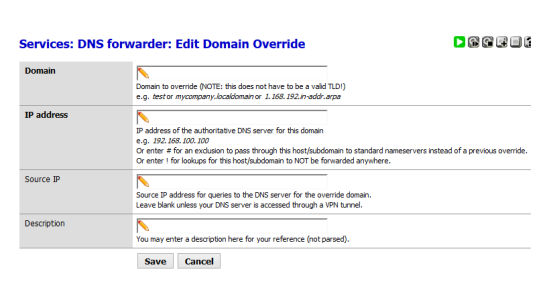
# It’s done. Now go to your pfsense WebGUI>Services>DNS Forwarder
# Pull down the page and you’ll see Domain Overrides Section.
# Now click the plus icon for edit domain override option.
Domain_Override
# Fill you want to block the domain name. Enter ! in the IP Address Field.
# Leave blank in Source IP Filed.
# Fill the description what you want to be.
# Click Save.
# Done~!

Sorry for my bad English~! I just want to share what I know. Greeting from Myanmar. Thank you All.

Edward Jude

Introduce My Facebook Page~!

# Post မတင္ျဖစ္တာ အေတာ္ၾကာပါပီ။ ဟိုဟာလုပ္ ဒီဟာလုပ္နဲ႕ မတင္ျဖစ္ပါ။(အမွန္က ပ်င္းလို႕ပါ :P)

# ကၽြန္ေတာ္လက္ရွိလုပ္ေနတဲ့အလုပ္က facebook Page ေလးကိုပဲ အညႊန္းအေနနဲ႕ေၾကာ္ျငာပါရေစ။

# အဲ့မွာရွိတာမ်ားပါတယ္။ လုပ္ထားတဲ့ Project ေတြကိုလဲ တင္ထားပါတယ္။ Messg နဲ႕ ဆက္သြယ္အၾကံျပဳႏိုိင္ပါတယ္။

ေက်းဇူးတင္ပါသည္။

https://www.facebook.com/igscrackers

Blocking Domains with PFSense using Bind~!

###################################################
This document is not written by me. I just only want to note and
share who want to learn. (ejnetwork)
Author is denoted under below!
##################################################
Blocking Domains with PFSense using Bind
Last Updated: 11/13/2013
By: Phillip Tarrant

Purpose:
The purpose of this paper is to show how to use Bind and PFSense to create a DNS blackhole.
This will allow the administrator to block any domain from users. This is very useful if one
wishes to block HTTP and HTTPS traffic to a domain. Squidguard is great for blocking HTTP,
however, since HTTPS traffic is encrypted Squid cannot block or filter this traffic. A DNS
blackhole is the most accepted way known to blocking the domain from any traffic (this includes
ALL ports)!

Requirements: You will need the following
PFSense box running PFSense 2.0+
Know how to install packages on PFSense and have access to do such.
Some general Internet/DNS Knowledge. (Not required, but helpful)
Active Directory Note:
If you need to use another DNS Server (such as a Windows Server running Active Directory).
Simply have the Windows Server use PFSense as the only forward in it’s DNS Configuration.
This will allow the Windows clients in the domain still be able to see domain resources and the
AD Controller, but still be filtered. Bind in this configuration will still seek and resolve any internet
domains not expressly configured in it’s zone settings. DNS calls will be cached on Bind and
resolve faster for you. It’s a Win/Win.
Note: No firewall rules are needed for this configuration. The clients need to use PFSense
Internal IP (LAN, OPT1 etc) as their DNS Server. Preferably the only DNS Server in their config.
After changing your clients config, you may need to flush any DNS cache on the client.
Rebooting is the easiest way to do this.

Procedures:
Step 1. Install the Bind package
● Log into PFSense and go to the SYSTEM tab. Under that tab you will select Packages.
● Click on the Available Packages Tab.
● You are looking for the bind package.
● Below is a screenshot of how it should look.
Step 2. Access Bind Config
● After install you can configure bind by going to Services → Bind Server
Step 3. Settings for Bind
Bind is a very powerful DNS server and capable of many things. As such, it has many many
configuration options that can be confusing. We will take things one tab at a time and I will
explain each relevant section and outline the settings needed and why they are needed.

3.1Settings Tab
Daemon Settings –
Enable Bind – Here you will check “enable bind” to enable the service.
Listen-on are the interfaces you want bind to listen on. Control+Click on any interfaces
you want bind to listen on. I do NOT recommend WAN!
Enable Notify – Unchecked, We don’t have any slave servers to worry about.
Hide Version – Unchecked, just an extra bit of security.
Limit Memory Use – The Default of 256mb is fine.
Logging –
Leave logging disabled for now, if you have issues I recommend it set to:
Loggin Severity set to “Error” and Loggin Options set to “Default”
Response Rate Limit
Leave Rate Limit disabled for now (if you serve alot of clients or want to protect against
DDOS attacks you can enable)
Forwarder Config
Check forwarder to enable – List your ISP DNS or Google (8.8.8.8) using a semicolon ( ;
) after each one. EVEN IF YOU ONLY HAVE 1 SERVER LISTED YOU MUST END IN
A SEMICOLON ( ; ). Failure to do so will cause the service not to start as the config is
not correct!
Here is a screenshot showing the config, note the trailing semicolon ( ; )

3.2 ACL Tab
Leave to default for all. You can if you wish setup other list to allow only certain IP’s.
Depending on your network config. If you don’t have a domain or active directory setup, you
most likely want the default ACL as all your clients on your network will all use PFSense as it’s
primary DNS server.
However, if you have active directory setup or another internal DNS server setup, you may want
to limit the DNS to only serve your servers behind PFSense.
Again, nothing wrong with leaving the default options set for now.

3.3 Views Tab
Views –
We are just going to setup one view. You could setup several types, but one will do for
us. We will call it “Everyones View” and set it to do Recursion, matching any clients (this
is the ACL we setup earlier) and allow-recursion to any.
In general, you are always going to use “everyones view” for your setup. Seeing how
only the LAN side of PFsense is really going to use the DNS server every client will need
the same settings.

3.4 Zones
Ahh zones, now we get to the complicated / fun blocking part. Since everything else is
configured we get to add zones our DNS server will control. These are the zones we want to
block. We will be using facebook.com for our examples. You can add as many zones(domains)
as you wish later such as Twitter, or Youtube.

Add a Zone
Click the plus button to start the add a zone wizard.
Domain Zone Configuration
Zone name – This is the domain you wish to block. So we enter facebook.com.
Description – This is not parsed so we can type anything here. we enter “blocking
facebook”
Zone type – Master (as we want to be the authority for this zone)
View – Here we select which view to use, we are going to use the “everyone view” we
setup earlier.
Reverse zone – Leave unchecked as this won’t deal with IP to domain DNS
No custom options are needed.

You can see a screenshot of our configuration on the next page.
DNSSEC
This is skipped along with Slave Zone (as this is a master). Forward Zone config is also
skipped as it’s not a forward zone. This is not the same as Forwarding DNS Servers. We
configured those back in on the first Settings Tab.

Master Zone Config –

TTL – we set to 128 (should be plenty for internal DNS).
Nameserver – this the name of your PFsense box as a FQDN. I’ll set mine to
pfsense.example
Base Domain IP – 127.0.0.1
Mail Admin Zone – hostmaster.example.com
Serial – any 32bit number, but typicall the format is YYYYMMDDXY (XY can be
anything, but we will use 01). This number doesn’t have to be accurate for this
configuration. but we will set it to 2013111201 for now (11/12/2013 date: 01 is my XY)
Refresh – 1d
Expire – 4w
Minimum – 1h
Allow-Update – UNMARKED we don’t want anyone but us updating this
Allow-Query – ANY we want everyone to be able to query this zone
Allow-Transfer – Unmarked – we don’t want this to propigate to anyone.

Zone Domain Records

Record = *
Type = A
Priority = Blank
Alias or IP = 127.0.0.1
We will add another for www just for good measure. Same settings, but the record will
be www. Now it should look like this:
Hit save and all should be well.

Step 4 Verify your settings

Hit the edit button next to our new zone and scroll to the bottom. We want to verify the settings
by comparing you’re resulting zone config file with our example:
You should see a screen like the screenshot on the next page:
Step 5. Add other zones you wish to block.
To add another zone to block we do the same steps outlined in Step 6. Just changing the
zone name to whatever domain you want. Twitter.com or Youtube.com are the most common
request.

Make Microsoft Security Essentials Update Distribution Server~!

AntiVirus Solution ေတြထဲမွာ အေကာင္းစား Program ေတြအေျမာက္အျမားရွိပါတယ္။
ဒါေပမဲ့ အိမ္သံုး အေသးစားလုပ္ငန္းေတြအတြက္ တစ္ႏွစ္လိုု္င္စင္ဆိုတာ ကၽြန္ေတာ္တို႕ လို
ျမန္မာႏိုင္ငံသားေတြအတြက္ အဆင္မေျပပါဘူး။ ဒါေၾကာင့္ Microsoft ကေန Free ရေနတဲ့ Microsoft Security Essentials ကို သံုးျဖစ္ပါတယ္။ တခုရွိတာက အဲ့ဒီ MSE ဟာ
အေသးစားနဲ႕ အိမ္သံုးေလာက္ေတြအတြက္ပဲ ထုတ္ေပးတာျဖစ္ပါတယ္။ ၁၀လံုးသို႕မဟုတ္ ၁၀လံုးထက္ပိုသံုးခြင့္ေတာင္ ေပးမထားပါဘူး။ ဥပမာ စက္၁၀လံုးရွိရင္ တစ္လံုးခ်င္းစီ လုိက္ပီး
Update လုပ္ေပးရမွာပါ။ Update Distribution Server ပံုစံမ်ိဳး Feature လည္းထည့္
ေပးမထားပါဘူး။ အဲတာနဲ႕ ကၽြန္ေတာ္လည္း Googling ေပါ့။ လုပ္ထားတဲ့ မူရင္း Project ပိုင္ရွင္ရွိပါတယ္။ ဒီလင့္ခ္မွာ သြားေလ့လာလို႕ရပါတယ။္ http://rafaelwolf.com/?p=725
သူ႕အတိုင္းလိုက္လုပ္ၾကည့္ပါတယ္။ တခ်ိဳ႕ Dos command ေတြဟာလဲမွားေနတာေတြ႕ပါတယ္။
တကယ့္ UNC path update ကလဲ အလုပ္မလုပ္ပါဘူး။ ရေအာင္ လိုက္လုပ္ၾကည့္ရင္း
Windows Update Service ဖြင့္ခိုင္းလိုက္ Windows Update လုပ္ခိုင္းလိုက္နဲ႕အဆင္မေျပ ပါဘူး။ အဲေတာ့ ျမန္မာ့နည္း ျမန္မာဟန္ Copy လုပ္ဖို႕ စိတ္ကူးလိုက္ပါတယ္။ အဆင္လဲေျပ ပါတယ္။ MSE ဟာ Online Update လုပ္လိုက္တိုင္း သူ႕ရဲ႕ path လမ္းေၾကာင္း ဖိုင္နာမည္ကို ေျပာင္းလဲပစ္ပါတယ္။ပီးေတာ့ သူ႕ရဲ႕ သိမ္းတဲ့ Definitions Folder ဟာ XP နဲ႕ Windows 7 မွာ နည္းနည္းမူကြဲပါတယ္။ Windows 8 ကေတာ့ မစမ္းသပ္ရေသးပါဘူး။

Step 1 – Update Distribution Server အျဖစ္ အသံုးျပဳမဲ့စက္ကို Folder တစ္ခုေဆာက္ပီး Share ေပးထားပါ။ permission နဲ႕ security ကို everyone ေပး ထားပါ။

Step 2 – အင္တာနက္ရွိတဲ့စက္ကေန MSE update EXE ဖိုင္ mpam-fe ကို ေဒါင္းထားပါ။ ပီးရင္ WinRAR ျဖစ္ျဖစ္ တခုခုနဲ႕ Extract လုပ္ေပးပါ။

Step 3 – ခုန extract လုပ္ထားတဲ့ Folder ထဲက exe ဖိုင္ တစ္ဖိုင္ထဲကိုခ်န္ထားပီး က်န္တာအကုန္ကူးပီး Share လုပ္ထားတဲ့ Folder ထဲကိုထည့္ေပးပါ။ ဒါဆို Server ပိုင္း
လုပ္စရာကုန္ပါပီ။

Step 4 – Client ေတြဘက္ကိုေတာ့ Pre-configure Batch ဖိုင္တစ္ဖိုင္ကို Windows Startup ထဲထည့္ေပးပါ။ Logon Script အေနနဲ႕ သံုးလဲရပါတယ္။ ကၽြန္ေတာ္ ကေတာ့ Startup ထဲပဲ ထည့္ပါတယ္။ ဒါဆိုရင္ စက္တက္တိုင္းတက္တိုင္း Server ဆီကေန ဖိုင္ကို Update လုပ္ေနမွာျဖစ္ပါတယ္။

ႈImportant Notes: : ကၽြန္ေတာ္ပထမေျပာခဲ့တဲ့အတိုင္း Destination Folder Name ဟာစက္တခုခ်င္းစီ မတူပါဘူး။ ဒါေၾကာင့္ Client မွာ Startup ထည့္တိုင္း အဲ့ဒီ Client ရဲ႕ Destination Folder Name ကို Batch Script ထဲက Client Destination ေနရာမွာ သြားျပင္ေပးယံုပါပဲ။ အိုေက

ေအာက္ကဟာကို Copy ကူးပီး လုိအပ္သလိုျပင္ပါ။

@echo off
echo:
echo ———————————————————————-
echo “Batch Scripting By”
echo – Hla Tun ( ———- Co., Ltd )
echo ———————————————————————-
echo:
::Client Destination
set usoe=”%homedrive%\Documents and Settings\All Users\Application Data\Microsoft\Microsoft Antimalware\Definition Updates\{A48B189B-6869-484E-809A-F2EEB88A08C0}”
::Server Source
set ukh=”\\1.1.1.1\avupdate\mpam-fe”
echo:
echo Shutting Down Microsoft Malware Protection Center ~~!!
echo:
net stop msmpsvc
If exist “%usoe%\mpavdlta.vdm” goto upload
echo Update Files Not Exist~~
goto exit
echo:
:upload
echo:
echo Malware Protection Data Uploading …
echo:
xcopy %ukh% %usoe% /R /Y /Z
echo:
echo Starting Up Microsoft Security Client ~~!!
echo:
net start msmpsvc
echo:
echo ————————————————————————
echo Data Updating is Completed ! Finished !
echo ————————————————————————
echo Bye Bye ~! 
echo ————————————————————————
echo:
:exit
pause

How to install WindowsNT Service (Batch Program) ~!

# NT Service ထဲကို install လုပ္တဲ့ပံုစံပါ။ Google မွာရွာၾကည့္ရင္ေတာ့ Visual Studio သံုးပီးေတာ့ Variable ထည့္တဲ့ဟာေတြ၊ .Net Framework သံုးတဲ့ဟာေတြပဲ ထြက္လာပါတယ္။

# ခက္တာက ကၽြန္ေတာ္က အရင္တုန္းက World Of Warcraft Server လုပ္ထားဖူးေတာ့ Apache, MySQL တို႕ကို Batch Program နဲ႕ Run တာ ျမင္ဖူးထားပါတယ္။ အဲဒီေတာ့ေထြေထြ ထူးထူး မရွာေတာ့ပဲ စက္မွာသြင္းထားတဲ့ XAMPP ဘက္ကို ဦးလွည့္လိုက္ပါတယ္။ အထဲ Directory ထဲကို ၀င္ၾကည့္ပီး နည္းနည္း နမူနာယူလိုက္တယ္ေပါ့။ ကၽြန္ေတာ္ထည့္တာကေတာ့ တျခား Service ပါ။ ဒါေပမဲ့ ပံုစံကို example အေနနဲ႕ Notes မွတ္ပါမယ္။ ေနာက္ျပန္ၾကည့္လို႕ရတာေပါ့။

# Install Service

@echo off
echo:
echo Batch Scripting By Hla Tun ( _________________ Co., Ltd ) ~~~!
echo:
if “%OS%” == “Windows_NT” goto WinNT

:WinNT
echo:
echo Installing Service On Baby Computer!
echo:
“path” –install servicename -c “config_path”
echo:
echo Finished!
echo:
:exit
pause

# Uninstall Service

@echo off
echo:
echo Batch Scripting By Hla Tun ( _______________ Co., Ltd ) ~~~!
echo:

if “%OS%” == “Windows_NT” goto WinNT

:WinNT
echo:
echo Time To Say Goodbye Service ….
echo:
“path” –uninstall servicename -c “config_path”
echo:
echo Successfully Remove ~!
echo:
:exit
pause